Why These Ruby-Hued Treats Deserve a Spot in Your Recipe Collection
The moment you bite into a perfectly baked red velvet cookie, you’re experiencing a delightful contradiction – a treat that’s simultaneously bold in appearance yet subtle in flavor. These eye-catching, crimson-colored morsels have steadily climbed the ranks of popular homemade desserts in recent years. Consequently, home bakers everywhere are hunting for the ideal Red Velvet Cookies recipe to recreate these bakery favorites in their own kitchens.
Throughout this comprehensive guide, we’ll journey together through every aspect of crafting these stunning cookies. Additionally, we’ll explore their culinary origins, dive into ingredient science, and share professional-level techniques to ensure your cookies turn out flawlessly every single time.
Whether you’re preparing for a holiday gathering, seeking a special dessert for Valentine’s Day, or simply craving something sweet with visual impact, these cookies deliver an unmatched combination of aesthetic appeal and scrumptious taste. Furthermore, once you grasp the fundamental techniques, they’re remarkably straightforward to prepare.
The Unexpected Origins of Red Velvet Baked Goods
Before we dive into our Red Velvet Cookies recipe, let’s uncover the fascinating backstory of this distinctive flavor profile. Interestingly, red velvet originated during the Victorian era not as a color-focused dessert, but as a texture-focused one. The original reddish hue wasn’t from food coloring but instead resulted from an intriguing chemical interaction between unprocessed cocoa powder, acidic vinegar, and buttermilk.
During the resource limitations of World War II, innovative bakers began incorporating beet juice to enhance the reddish color. Eventually, as food coloring became more accessible, the vivid crimson shade we now immediately recognize as red velvet became the standard. The evolution from cake to cookies happened organically as creative bakers experimented with applying the beloved flavor to different dessert formats.
Explore more about cookie chemistry and texture development in our detailed guide.
Key Components for Exceptional Red Velvet Cookies
A truly outstanding Red Velvet Cookies recipe relies on quality ingredients working in harmony. First, you’ll need to gather these essential elements:
- Unbleached all-purpose flour: Provides structure without overpowering the delicate flavor
- Natural cocoa powder: Delivers that characteristic subtle chocolate note (avoid Dutch-processed for best color reaction)
- Unsalted butter: Gives you complete control over the salt content
- Combined sugar types: Both granulated and brown sugars for optimal texture and moisture retention
- Room-temperature eggs: Critical for proper emulsification and structure
- Red food coloring: Gel-based varieties provide concentrated color without thinning the dough
- Pure vanilla extract: Adds depth and complexity to the flavor profile
- White distilled vinegar: Activates the chemical reaction that enhances the red coloration
- Fresh baking soda: Creates the ideal rise and texture
- Fine sea salt: Balances sweetness and enhances all other flavors
- Premium white chocolate chips: Offers the perfect creamy contrast to the red velvet base
Understanding the specific purpose behind each ingredient empowers you to make intelligent substitutions when necessary. For example, if artificial food coloring concerns you, natural alternatives like beetroot powder can work effectively. The quality of your cocoa powder is particularly crucial in a Red Velvet Cookies recipe since it forms the foundation of the signature flavor.
Detailed Walkthrough: Creating Perfect Red Velvet Cookies
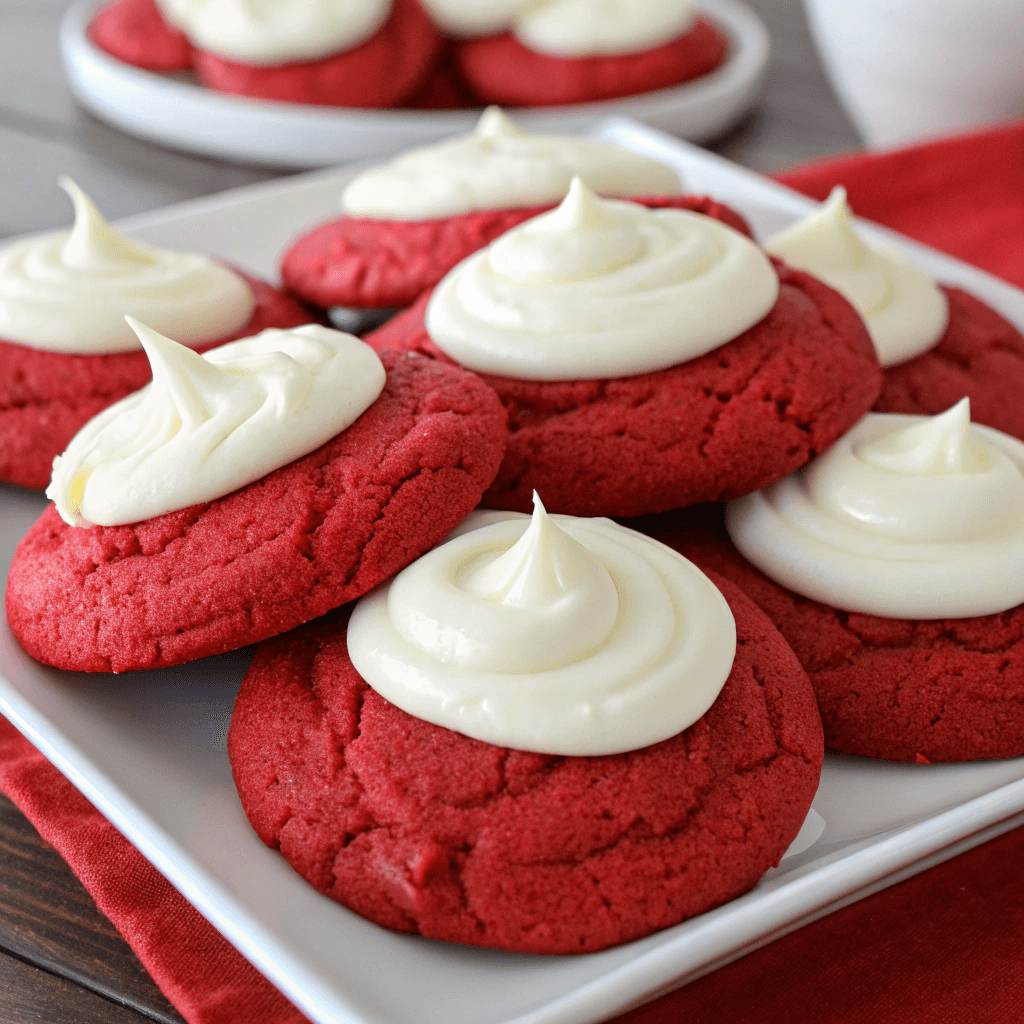
Now that we’ve covered the fundamentals, let’s proceed with our comprehensive Red Velvet Cookies recipe. Following these precise instructions will produce approximately two dozen delectable cookies with the perfect texture combination – slightly crisp edges with soft, chewy centers.
Ingredients:
- 2¾ cups (345g) unbleached all-purpose flour
- ¼ cup (25g) natural unsweetened cocoa powder
- 1 teaspoon baking soda
- ½ teaspoon fine sea salt
- 1 cup (226g) unsalted butter, softened to room temperature
- 1 cup (200g) granulated sugar
- ½ cup (100g) packed light brown sugar
- 2 large eggs, at room temperature
- 2 tablespoons red gel food coloring
- 2 teaspoons pure vanilla extract
- 1 teaspoon white distilled vinegar
- 1½ cups (270g) premium white chocolate chips
Instructions:
- Begin by whisking together the flour, cocoa powder, baking soda, and salt in a medium bowl until thoroughly combined. Subsequently, set this dry ingredient mixture aside.
- In a large mixing bowl, beat the softened butter with both sugars until the mixture becomes light and fluffy, approximately 3-4 minutes. Additionally, pause occasionally to scrape down the sides of the bowl for even incorporation.
- Incorporate the eggs one at a time, ensuring each is fully integrated before adding the next. Then mix in the red food coloring, vanilla extract, and vinegar until the color appears uniform throughout.
- Gradually introduce the dry ingredients to the wet mixture, mixing on low speed just until no flour streaks remain. Overmixing will develop gluten and lead to tough cookies, so exercise restraint.
- Gently fold in the white chocolate chips by hand using a flexible spatula. Subsequently, cover the bowl tightly and refrigerate the dough for a minimum of 2 hours, though overnight chilling produces optimal flavor development.
- When you’re ready to bake, preheat your oven to 350°F (175°C). Meanwhile, line your baking sheets with parchment paper or silicone mats.
- Portion the thoroughly chilled dough into 1½-inch balls (about 2 tablespoons each) and position them 2 inches apart on your prepared baking sheets.
- Bake for 10-12 minutes until you notice the edges setting while the centers still appear slightly soft. Furthermore, remember that the cookies will continue firming up from residual heat after removal from the oven.
- Allow the cookies to rest on the baking sheet for 5 minutes before transferring them to a wire cooling rack to cool completely.
This Red Velvet Cookies recipe achieves the perfect balance between subtle chocolate flavor and striking visual appeal. However, you might need to adjust baking times based on your specific oven’s peculiarities.
Solutions for Common Red Velvet Cookie Challenges
Even with a meticulously crafted Red Velvet Cookies recipe, occasional complications can arise. Nevertheless, most issues have straightforward remedies. Here are the most frequent problems and their effective solutions:
Color Disappointments
If your cookies lack that vivid red hue, your cocoa powder might be too alkaline. Therefore, ensure you’re using natural (non-Dutch processed) cocoa powder. Additionally, increasing the vinegar slightly can intensify the red-enhancing chemical reaction.
Texture Inconsistencies
Are your cookies spreading excessively during baking? Consequently, your butter might be too warm or the dough insufficiently chilled. Moreover, check your baking soda’s freshness, as expired leavening agents significantly impact rise and texture development.
Flavor Imbalances
Not detecting enough chocolate notes? Consider increasing the cocoa powder by a tablespoon. Conversely, if the cocoa flavor overwhelms, reduce it slightly in your next batch.
Remember that baking effectively combines both precise science and intuitive art. Therefore, don’t hesitate to make detailed notes and thoughtful adjustments to tailor this Red Velvet Cookies recipe to your personal preferences and equipment.
Healthier Interpretations of Traditional Red Velvet Cookies
While classic Red Velvet Cookies recipes offer undeniable indulgence, you might seek more nutritious alternatives. Fortunately, several thoughtful modifications can create healthier versions without sacrificing essential flavor characteristics.
Sugar Reduction Strategies
You can typically decrease sugar content by up to one-third without dramatically affecting texture. Additionally, natural alternatives like coconut sugar or carefully measured monk fruit sweetener can replace some or all of the refined sugar.
Gluten-Free Approach
For those with gluten sensitivities, high-quality measure-for-measure gluten-free flour blends perform admirably in this recipe. However, if your blend lacks xanthan gum, consider adding ½ teaspoon to maintain proper binding properties.
Natural Coloring Solutions
If you prefer avoiding synthetic food colors, several natural options exist:
- Beetroot powder (2-3 tablespoons)
- Pureed roasted beets (¼ cup, with corresponding liquid reduction elsewhere)
- Plant-based natural food colorings
Research published in the Journal of Food Science indicates that natural colorants can deliver comparable visual impact while potentially offering additional nutritional benefits.
Innovative Twists on the Classic Red Velvet Cookies Recipe
The foundational Red Velvet Cookies recipe provides an excellent starting point for creative experimentation. Therefore, consider these exciting variations to customize your cookies for different occasions:
Cream Cheese-Filled Red Velvet Treasures
Prepare a filling using 8 ounces cream cheese, ¼ cup sugar, and 1 teaspoon vanilla extract. Subsequently, encase small portions of this chilled filling within the cookie dough before baking for a decadent surprise center.
Red Velvet Cookie Sandwiches
Create smaller-sized cookies and, once cooled, spread cream cheese frosting between pairs to form elegant sandwich cookies. Consequently, you’ll have sophisticated treats perfect for gifting or special gatherings.
Seasonal Adaptations
- Incorporate crushed candy canes for festive Christmas cookies
- Shape into hearts and add pink sanding sugar for Valentine’s Day
- Add orange zest and Halloween-themed sprinkles for October celebrations
These creative interpretations keep your Red Velvet Cookies recipe feeling fresh and exciting year-round. Moreover, they enable you to accommodate special dietary requirements or taste preferences of your friends and family.
Professional Secrets for Bakery-Quality Red Velvet Cookies
Elevating your Red Velvet Cookies recipe from good to exceptional requires attention to subtle details. Professional pastry chefs recommend these specialized techniques for truly outstanding results:
Precision Measurement
Utilizing a digital kitchen scale for flour and cocoa powder ensures remarkable consistency. In fact, merely 2 tablespoons of excess flour can dramatically alter texture, resulting in dry, crumbly cookies.
Temperature Awareness
Room temperature ingredients incorporate more completely and uniformly. Furthermore, removing cookies from the oven when they appear slightly underdone yields the perfect chewy texture as they continue baking from residual heat.
Make-Ahead Convenience
This dough freezes exceptionally well. Portion into individual balls, freeze solid on a baking sheet, then transfer to airtight freezer containers. Subsequently, you can bake fresh cookies on demand by adding just 2-3 minutes to the standard baking time.
By implementing these professional-level techniques, your homemade cookies will rival those from high-end bakeries. Moreover, you’ll develop valuable baking skills transferable to countless other recipes.
Preserving Freshness: Storage Strategies for Red Velvet Cookies
Your carefully crafted Red Velvet Cookies recipe deserves proper storage to maintain optimal quality. Follow these expert recommendations for best results:
Short-Term Preservation
Store completely cooled cookies in an airtight container at room temperature. Additionally, including a slice of bread in the container helps maintain moisture and keeps cookies soft for up to 5 days.
Long-Term Freezing Method
Fully cooled cookies freeze beautifully for up to 3 months. First, arrange them in a single layer on a baking sheet and freeze until solid. Subsequently, transfer to freezer-safe containers with parchment paper between layers to prevent sticking.
According to food preservation specialists at the USDA Food Safety and Inspection Service, proper storage techniques not only maintain quality but also prevent potential food safety concerns.
Perfect Pairings: Complementary Flavors for Red Velvet Cookies
Your meticulously prepared Red Velvet Cookies recipe deserves thoughtful accompaniments. Here are expert pairing suggestions:
Beverage Companions
- Fresh whole milk: Provides classic comfort and balances sweetness
- Freshly brewed coffee: Offers pleasant bitter contrast against the sweet cookies
- Rich hot chocolate: Creates an indulgent chocolate-on-chocolate experience
- Aromatic teas: Earl Grey or vanilla-infused varieties provide sophisticated flavor counterpoints
Dessert Board Components
For an impressive dessert platter or special celebration, pair your cookies with:
- High-quality vanilla bean ice cream
- Seasonal fresh berries
- Premium dark chocolate pieces
The subtle chocolate undertones in a well-crafted Red Velvet Cookies recipe make these treats remarkably versatile. Furthermore, their striking appearance instantly elevates any dessert presentation.
Frequently Asked Questions About Red Velvet Cookies
Why aren’t my cookies achieving that signature bright red color?
Your recipe might lack sufficient acidity. Therefore, try incorporating an additional ½ teaspoon of vinegar to enhance the reaction with the cocoa powder. Additionally, some cocoa varieties contain higher alkaline levels, which can neutralize the red coloration. Consequently, experiment with different cocoa brands or switch to gel-based food coloring for more intense results.
Can I create red velvet cookies without artificial coloring?
Absolutely! You can develop naturally colored Red Velvet Cookies recipes using beetroot powder, beet puree, or freeze-dried berry powder. However, expect a deeper burgundy rather than bright crimson. Moreover, these natural alternatives may subtly influence flavor, potentially requiring minor adjustments to other ingredients.
What’s the secret to achieving that perfect chewy texture?
For irresistibly chewy red velvet cookies, slightly underbake them by removing from the oven when centers still appear soft. Furthermore, the combination of granulated and brown sugars significantly contributes to moisture retention. Additionally, thoroughly chilling the dough prevents excessive spreading during baking, directly impacting final texture.
Is this cookie dough suitable for freezing?
Yes, this Red Velvet Cookies recipe freezes exceptionally well. First, portion the prepared dough into individual balls. Subsequently, freeze them on a lined baking sheet until solid, then transfer to freezer-safe bags for storage up to 3 months. When ready to bake, add approximately 2-3 minutes to the standard baking time.
What causes that unpleasant metallic aftertaste?
Excessive baking soda often creates metallic flavors. Therefore, measure precisely and confirm you’re using exactly 1 teaspoon per batch. Additionally, certain red food colorings can impart off-flavors, so consider trying different brands or transitioning to natural alternatives.
How can I adapt this recipe for vegan dietary needs?
Replace butter with plant-based butter alternatives, substitute eggs with flax eggs (1 tablespoon ground flaxseed mixed with 3 tablespoons water per egg), and select vegan-friendly white chocolate chips. Moreover, verify your food coloring contains no animal derivatives, as some contain carmine from insects.
What’s the best method for maintaining cookie softness during storage?
Store in completely airtight containers with a small piece of sandwich bread to provide moisture. Furthermore, avoid mixing crisp and soft cookies in the same storage container. Additionally, if cookies begin hardening, placing a slightly dampened paper towel in the container overnight can help restore tenderness.
Conclusion: Becoming a Red Velvet Cookie Master
Throughout this comprehensive guide, we’ve explored every nuance of creating perfect red velvet cookies. From understanding the chemistry behind these vibrant treats to troubleshooting common challenges, you now possess all the knowledge needed to achieve spectacular results.
The ideal Red Velvet Cookies recipe strikes a beautiful balance between striking visual impact and complex flavor notes, creating a truly memorable baking experience. Moreover, with the creative variations and adaptations we’ve discussed, you can customize these cookies for any occasion or dietary requirement.
Remember that mastery comes through practice when developing baking skills. Therefore, don’t feel discouraged if your initial attempts aren’t picture-perfect. Each batch brings you closer to developing intuitive understanding of the process.
We hope this guide inspires you to create your own magnificent red velvet cookies. Furthermore, we encourage you to share your experiences and any unique variations you develop! These visually stunning treats are certain to become a cherished addition to your baking repertoire, bringing joy to everyone fortunate enough to taste them.


