Nothing elevates a dessert quite like Homemade Cherry Pie Filling. Beyond the superior taste, creating this ruby-red delight at home gives you complete control over ingredients and flavor. Throughout this guide, you’ll discover the secrets to crafting perfect cherry filling from scratch.
Why Make Your Own Cherry Pie Filling?
Making your own Homemade Cherry Pie Filling offers several advantages over store-bought versions. Although commercial options provide convenience, they simply cannot match the quality and satisfaction of homemade filling.
Healthier and More Natural Ingredients
Store-bought Homemade Cherry Pie Filling typically contains preservatives, artificial colors, and high-fructose corn syrup. In contrast, creating your own version allows you to select wholesome ingredients that enhance rather than mask the natural cherry flavor.
When preparing filling at home, you can use:
- Fresh or frozen cherries without chemical additives
- Natural sweeteners like honey or pure cane sugar
- Fresh lemon juice for brightness
- Pure vanilla or almond extract for depth
- Simple thickeners like cornstarch or arrowroot
Furthermore, homemade versions eliminate unnecessary additives and artificial colors. Instead, the vibrant red hue comes naturally from the cherries themselves, resulting in a filling that’s not only more delicious but also better for you.
Better Flavor and Freshness
The most compelling reason to make Homemade Cherry Pie Filling is the remarkable flavor difference. Commercial fillings often taste flat or artificial, whereas homemade versions showcase the bright, complex flavor of real cherries.
Moreover, when preparing your own filling, you can enhance the natural cherry essence with complementary ingredients. A touch of almond extract, for instance, beautifully highlights cherry notes. Additionally, a splash of lemon juice brightens the flavor while balancing sweetness.
Besides superior taste, Homemade Cherry Pie Filling boasts better texture. The cherries maintain their integrity instead of becoming mushy, creating a more appealing mouthfeel with distinct pieces of fruit throughout your desserts.
Customizable Sweetness and Thickness
Another advantage of Homemade Cherry Pie Filling is complete customization. Unlike one-size-fits-all commercial products, homemade versions can be tailored to your exact preferences and recipe requirements.
When making your own filling, you can:
- Adjust sweetness based on the cherries’ natural sugar content
- Control thickness for different applications (runnier for topping ice cream, thicker for pies)
- Balance flavors with spices like cinnamon or cardamom
- Modify texture from chunky to smooth
Furthermore, this customization extends to dietary needs. If you’re watching sugar intake, you can reduce sweeteners or use alternatives. Therefore, creating your own Homemade Cherry Pie Filling provides both culinary freedom and peace of mind.
Choosing the Right Cherries for Your Filling
The foundation of excellent Homemade Cherry Pie Filling starts with selecting appropriate cherries. Your choice will significantly impact flavor, color, and overall success.
Sweet vs. Tart Cherries
When making Homemade Cherry Pie Filling, you’ll decide between sweet and tart varieties. Both create delicious results but with distinctly different profiles.
Tart cherries (Montmorency or Morello) are traditionally preferred for pies due to their bright, acidic flavor that balances well with sugar. These cherries maintain structure during cooking and deliver that classic cherry pie taste. Additionally, their natural acidity helps activate pectin, contributing to proper thickening.
Conversely, sweet cherries (Bing or Rainier) offer more natural sweetness requiring less added sugar. However, they’re juicier and sometimes create looser filling unless additional thickener is used. Nevertheless, they provide beautiful deep color and rich flavor to your Homemade Cherry Pie Filling.
Fresh, Frozen, or Canned Cherries: What Works Best?
When preparing Homemade Cherry Pie Filling, cherry form matters almost as much as variety.
Fresh cherries provide the most vibrant flavor and texture. When in season (typically late spring through summer), these peak-freshness fruits yield exceptional results. However, they require pitting, which takes time without a proper cherry pitter. Nevertheless, many find the superior flavor worth this extra effort.
Alternatively, frozen cherries offer excellent year-round options for Homemade Cherry Pie Filling. Usually flash-frozen at peak ripeness, they maintain much of their flavor and nutritional value. Moreover, frozen cherries typically come pre-pitted, saving preparation time. Before using, thaw them partially to ensure even cooking.
Canned cherries can work in a pinch, particularly those packed in water rather than syrup. However, they generally deliver less distinct flavor and softer texture. If using canned cherries, drain thoroughly and adjust sugar and thickener accordingly.
Essential Ingredients for Cherry Pie Filling
Creating perfect Homemade Cherry Pie Filling requires more than just cherries. Supporting ingredients enhance natural cherry flavor while achieving ideal consistency.
Main Ingredients Breakdown
The foundation of Homemade Cherry Pie Filling includes several key components:
Cherries form the base, with 5-6 cups of pitted cherries yielding enough filling for a standard 9-inch pie. The natural pectin in cherries contributes to thickening, especially when activated by heat and acid.
Sugar provides sweetness while helping preserve the filling and enhance natural cherry flavor. For tart cherries, you’ll typically need 3/4 to 1 cup of sugar, while sweet cherries may require only 1/2 to 3/4 cup.
A thickening agent creates proper consistency. Cornstarch creates a clear, glossy sauce without clouding the vibrant color of your Homemade Cherry Pie Filling. Usually, 2-3 tablespoons suffice for a pie’s worth of filling. Tapioca starch and arrowroot powder serve as excellent alternatives.
Alternative Ingredients for Different Preferences
While basic Homemade Cherry Pie Filling requires few ingredients, numerous alternatives can accommodate dietary restrictions or create unique flavor profiles.
For those seeking natural sweetener alternatives, honey, maple syrup, or coconut sugar can replace conventional sugar. These options reduce refined sugar while contributing distinctive flavor notes. When substituting, start with about 25% less than the recipe calls for.
Flavor enhancers transform basic cherry filling into something special:
- 1/4 teaspoon almond extract (complements cherries exceptionally well)
- 1 tablespoon lemon juice (brightens flavor)
- 1-2 tablespoons kirsch or brandy (adds complexity)
- Vanilla bean or extract (provides warmth)
- Warm spices like cinnamon or star anise (perfect for winter desserts)
For specific dietary needs, your Homemade Cherry Pie Filling adapts easily. Arrowroot or tapioca starch make excellent gluten-free thickeners, while monkfruit sweetener works for sugar-free versions.
Step-by-Step Guide to Making Cherry Pie Filling
Now let’s walk through creating perfect Homemade Cherry Pie Filling from start to finish.
Preparing the Cherries
The first step in making exceptional Homemade Cherry Pie Filling involves proper cherry preparation. This phase directly impacts texture and flavor.
Begin by washing cherries under cool water, regardless of whether you’re using fresh, frozen, or canned fruit. Subsequently, remove stems and pits if using fresh cherries. A cherry pitter makes this faster, though you can also use a paperclip or chopstick if needed. For frozen cherries, thaw partially—just enough to separate them.
Next, decide whether you want whole cherries, halves, or chopped pieces in your Homemade Cherry Pie Filling. Whole pitted cherries create rustic filling with distinct fruit pieces. Conversely, halving releases more juice and creates more uniform texture. Consider that larger pieces maintain more structure during cooking, while smaller pieces break down further.
Cooking Process
The cooking method for Homemade Cherry Pie Filling requires attention to detail for best results. This process transforms raw ingredients into cohesive, flavorful filling with perfect consistency.
Combine prepared cherries, sugar, and any spices in a medium saucepan. Allow this mixture to sit for about 10 minutes, encouraging cherries to release their juices. Subsequently, place the saucepan over medium heat and bring to a gentle simmer, stirring occasionally.
While the cherry mixture heats, prepare your thickening slurry. For standard Homemade Cherry Pie Filling, whisk together 3 tablespoons of cornstarch with 3 tablespoons of cold water until smooth. This cold slurry method prevents lumps. Once the cherry mixture simmers, gradually pour in the slurry while continuously stirring.
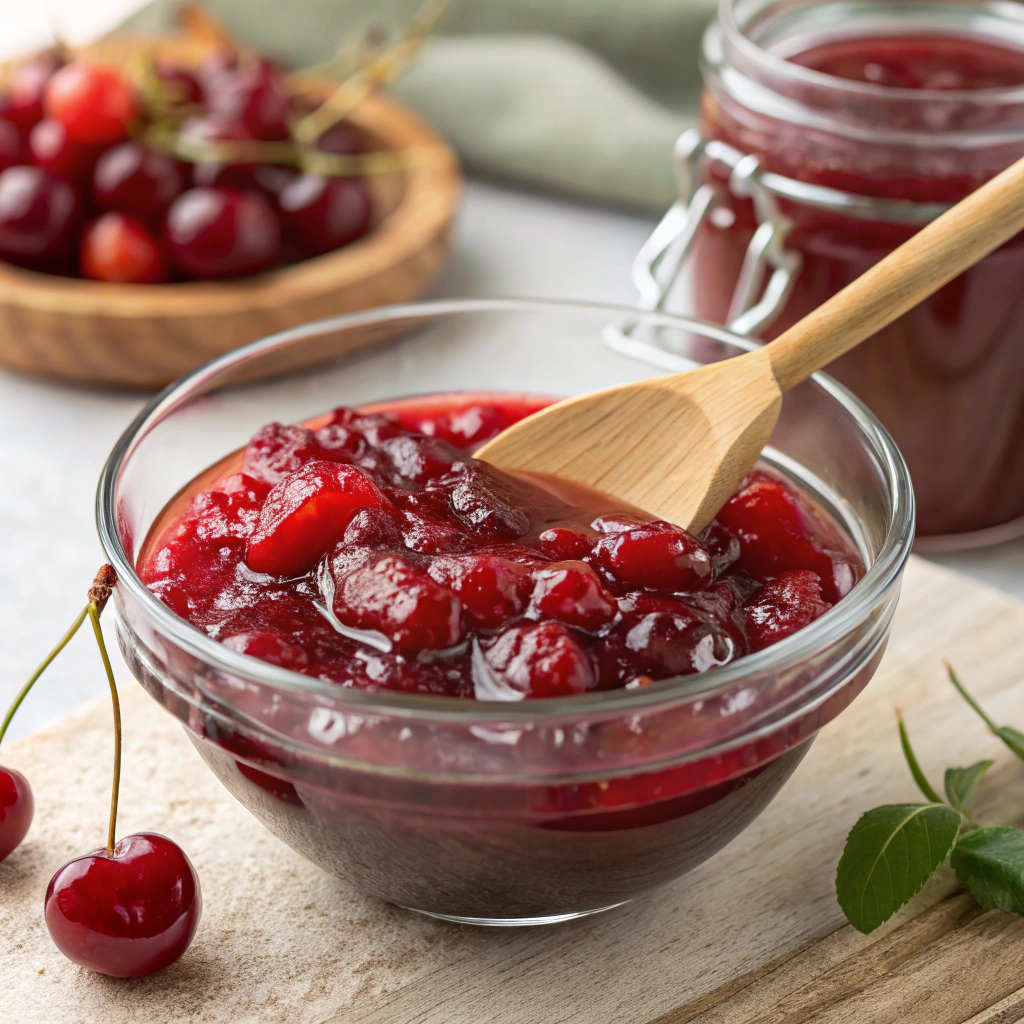
After adding thickener, cook the Homemade Cherry Pie Filling for 2-3 minutes until noticeably thickened. The filling should coat the back of a spoon without running off immediately. Moreover, the color will deepen as it cooks. Finally, remove from heat and stir in any extracts, as adding these delicate flavors after cooking preserves their aroma.
Achieving the Perfect Consistency
The final consideration involves achieving ideal consistency—thick enough to hold shape when cut but not gummy or paste-like. This balance requires understanding how thickeners work and how filling changes during cooking and cooling.
Remember that Homemade Cherry Pie Filling continues thickening as it cools. Consequently, remove it from heat when slightly thinner than your desired final consistency. A good visual cue: the filling should coat the back of a wooden spoon, and a finger drawn through leaves a clear path that doesn’t immediately fill in.
If your Homemade Cherry Pie Filling becomes too thick, thin with small amounts of water or juice while still warm. Conversely, if too thin, create additional slurry with 1 teaspoon cornstarch and 1 teaspoon cold water, then bring filling back to simmer while adding this mixture.
For best results when using your Homemade Cherry Pie Filling in baked goods, allow it to cool completely before adding to pie crusts. This cooling period allows proper setting and prevents excess liquid from making crusts soggy. Additionally, filling that has rested overnight often develops more complex flavor as ingredients meld together.
With these techniques, your Homemade Cherry Pie Filling will elevate any dessert to extraordinary heights, proving once again that homemade truly is best.
Tips for Perfecting Your Cherry Pie Filling
Creating the perfect Homemade Cherry Pie Filling requires attention to detail and a few expert techniques. While the basic process is straightforward, mastering these additional tips will elevate your cherry filling from good to exceptional.
Avoiding Common Mistakes
Even experienced bakers sometimes struggle with Homemade Cherry Pie Filling. Understanding these common pitfalls can help you achieve consistent results every time.
One frequent mistake is overcooking the cherries, which causes them to break down completely and lose their distinctive texture. To preserve cherry integrity, cook only until the mixture thickens and the cherries soften slightly but still maintain their shape. According to research from America’s Test Kitchen, monitoring cooking temperature closely and keeping it at a gentle simmer rather than a rolling boil helps preserve fruit structure.
Another common error involves improper thickener activation. Cornstarch and other thickeners must reach a specific temperature to fully activate. If your Homemade Cherry Pie Filling doesn’t thicken properly, you may not have cooked it long enough or at a high enough temperature. Additionally, adding thickener directly to hot liquid often results in lumps. Instead, create a slurry with cold liquid first, then gradually incorporate it into your hot cherry mixture while stirring constantly.
Finally, many home cooks make the mistake of under-seasoning their Homemade Cherry Pie Filling. A small pinch of salt enhances cherry flavor without making the filling taste salty. Similarly, a dash of quality vanilla extract can round out the flavor profile beautifully. These subtle additions make the difference between ordinary and extraordinary cherry filling.
How to Fix a Too-Thin or Too-Thick Filling
Sometimes despite your best efforts, your Homemade Cherry Pie Filling might not reach the perfect consistency. Fortunately, both too-thin and too-thick fillings can be salvaged with simple adjustments.
For filling that’s too thin, you have several options. The easiest fix is creating additional cornstarch slurry (1 teaspoon cornstarch mixed with 1 tablespoon cold water) and slowly adding it to the simmering filling while stirring constantly. Alternatively, you can reduce excess liquid by returning the filling to the stove and simmering gently, uncovered, until it reaches your desired thickness. Remember that the filling will continue thickening as it cools.
Conversely, if your Homemade Cherry Pie Filling becomes too thick, simply add small amounts of liquid while the mixture is still warm. Cherry juice makes an excellent thinner that won’t dilute flavor, but water or even a splash of kirsch (cherry liqueur) works well too. Add just a tablespoon at a time, stirring thoroughly between additions to avoid over-thinning.
Texture issues can also develop during storage. If your refrigerated filling becomes overly firm, gently warm it and add small amounts of liquid as needed. Similarly, frozen and thawed filling sometimes needs texture adjustment before using in recipes.
Storing and Preserving Homemade Cherry Pie Filling
One of the greatest advantages of making Homemade Cherry Pie Filling is the ability to prepare it in advance and enjoy it throughout the year. Proper storage methods extend shelf life while maintaining quality.
Refrigerator Storage
For short-term storage, refrigeration offers the simplest solution for Homemade Cherry Pie Filling. Properly stored, your filling will maintain optimal flavor and texture for 1-2 weeks.
Always cool filling completely before refrigerating. Transfer it to airtight glass containers rather than plastic, as the acidic nature of cherries can sometimes interact with plastic containers. Leave slight headspace to allow for expansion. Label containers with the preparation date to track freshness.
Before using refrigerated Homemade Cherry Pie Filling, allow it to come to room temperature and stir gently to redistribute any separated liquid. If the texture seems too firm, follow the thinning techniques discussed earlier. For baked applications, using the filling straight from the refrigerator often works well, as it will loosen during baking.
Freezing for Long-Term Use
Freezing extends the shelf life of Homemade Cherry Pie Filling significantly, allowing you to enjoy summer’s cherry bounty throughout the year. When properly frozen, cherry filling maintains quality for 8-12 months.
For best results, cool filling completely before freezing. Package in freezer-safe containers with at least 1/2 inch headspace to allow for expansion. Alternatively, freeze filling in ice cube trays, then transfer frozen cubes to freezer bags—this method creates convenient portions for smaller recipes or individual servings.
To use frozen Homemade Cherry Pie Filling, thaw overnight in the refrigerator rather than at room temperature. This gradual thawing helps preserve texture. After thawing, you may notice slight texture changes or liquid separation. Gently heat the filling in a saucepan, stirring to recombine, and adjust consistency if needed using the techniques described by food preservation experts at the National Center for Home Food Preservation.
Canning for Year-Round Enjoyment
For truly long-term storage, canning transforms Homemade Cherry Pie Filling into shelf-stable jars ready for use anytime. While requiring more equipment and time, this method preserves summer’s cherry harvest most efficiently.
Always follow tested, up-to-date canning recipes specifically designed for cherry pie filling to ensure safety. The acidity level of cherries makes water bath canning appropriate, but precise ingredient ratios must be maintained. Use only bottled lemon juice (not fresh) to ensure consistent acidity levels.
Process filled jars in a boiling water bath for the time specified by your recipe, typically 30 minutes for pint jars and 35 minutes for quarts. Properly sealed and processed jars of Homemade Cherry Pie Filling remain shelf-stable for 12-18 months when stored in a cool, dark place. After opening, refrigerate and use within 1-2 weeks.
Delicious Ways to Use Cherry Pie Filling
While traditional cherry pie might be the obvious choice, Homemade Cherry Pie Filling versatility extends far beyond a single dessert. Its rich flavor and texture make it perfect for countless sweet applications.
Classic Cherry Pie
The quintessential use for Homemade Cherry Pie Filling remains the classic cherry pie—a timeless dessert perfect for holidays, special occasions, or weekend family dinners. The vibrant filling paired with flaky, buttery crust creates an irresistible combination.
For the perfect cherry pie, prebake (blind bake) your bottom crust for about 10 minutes before adding the filling. This step prevents the dreaded “soggy bottom” that can plague fruit pies. Fill with cooled Cherry Pie Filling, then top with either a traditional lattice, full crust with decorative vents, or streusel topping. Bake until the crust turns golden brown and the filling begins bubbling slightly at the edges.
For an elevated twist on traditional cherry pie, consider adding complementary flavors. A teaspoon of almond extract in your crust recipe creates beautiful harmony with the cherry filling. Alternatively, a tablespoon of balsamic vinegar added to the filling while cooking deepens and intensifies cherry flavor impressively.
Cheesecake Topping
Cherry Pie Filling transforms ordinary cheesecake into a restaurant-quality dessert. The tart-sweet cherry flavor beautifully complements creamy, rich cheesecake.
For a stunning presentation, chill your baked cheesecake completely, then top with cooled cherry filling shortly before serving. This preserves the distinct layers and prevents the filling from bleeding into the cheesecake. Alternatively, create a marble effect by gently swirling slightly warmed filling into the cheesecake batter before baking.
Individual cheesecake parfaits offer an elegant dessert option without the fuss of a full cheesecake. Layer graham cracker crumbs, no-bake cheesecake filling, and Cherry Pie Filling in clear glasses for an impressive dessert that comes together in minutes.
Breakfast Ideas
While typically considered a dessert component, Cherry Pie Filling makes a delicious addition to breakfast dishes, adding natural sweetness and fruity flavor.
Warm Cherry Pie Filling creates a luxurious topping for pancakes, waffles, or French toast. For added indulgence, mix a few tablespoons of filling into waffle or pancake batter before cooking. The cherry pieces create bursts of flavor throughout.
Cherry-filled pastries make breakfast feel special. Spoon filling onto squares of puff pastry, fold into turnovers, and bake until golden. Similarly, filling can be used in homemade Danish pastries or as a topping for cheese blintzes.
For a healthier option, warm Cherry Pie Filling makes a delightful addition to yogurt parfaits or overnight oats. Layer with Greek yogurt and granola for a breakfast that feels indulgent while providing protein and nutrients to start your day right.
Conclusion
Mastering Homemade Cherry Pie Filling opens a world of culinary possibilities beyond simple pie. From proper preparation techniques to creative serving suggestions, this versatile cherry creation elevates everything from classic desserts to breakfast treats. By making your own filling, you control quality, ingredients, and flavor profile—resulting in superior results every time. Whether preserved through canning for year-round enjoyment or prepared fresh during cherry season, homemade filling consistently outperforms commercial alternatives in both taste and satisfaction.
FAQs
Can I use sweet cherries instead of tart cherries for pie filling? Yes, sweet cherries like Bing work well but typically require less sugar and possibly more lemon juice to balance sweetness.
How long does homemade cherry pie filling last in the refrigerator? Properly stored in airtight containers, refrigerated filling remains good for 1-2 weeks.
Can I use frozen cherries to make pie filling? Absolutely! Frozen cherries often work better than fresh for consistent results year-round.
Do I need to use cornstarch as a thickener? No, alternatives include tapioca starch, arrowroot powder, or Clear Jel for canned applications.
Can I make sugar-free cherry pie filling? Yes, substitute sweeteners like monkfruit, stevia, or erythritol, adjusting to taste.
for more recipes stay in globalyrecipe.us


