Looking for a side dish that brings the wow factor to your summer table? Cheesy Baked Corn on the Cob is here to steal the show! This golden, gooey delight isn’t just another way to serve corn—it’s a flavor-packed explosion of melted cheese, smoky spices, and sweet roasted kernels that’s both satisfying and easy to prepare.
In this guide, we’re diving deep into everything you need to know—from picking the best corn and choosing the right cheese to adding spicy or herbaceous twists. We’ll walk you through each step, share pairing ideas, highlight common mistakes, and even answer the top questions folks ask online. Whether you’re feeding a crowd or just spicing up a weekday dinner, this oven-roasted corn recipe delivers big.
So, grab your apron—because things are about to get deliciously messy.
Introduction to Cheesy Baked Corn on the Cob
The Allure of Cheesy Baked Corn on the Cob
Let’s be honest—corn on the cob is already a crowd-pleaser. But when you slather it in butter, sprinkle on your favorite spices, and top it off with melty cheese? Game. Changer. Cheesy Baked Corn on the Cob isn’t just a side dish; it’s a celebration of flavor, texture, and that irresistible pull of cheese strings with every bite.
This dish combines the sweetness of summer corn recipes with the indulgence of your favorite comfort food. Unlike traditional boiled corn, baking enhances its natural sugars, giving you caramelized kernels with a slight crisp. And then there’s the cheese—oh, the cheese! Whether it’s sharp cheddar, creamy mozzarella, or crumbly Cotija, the melted topping adds richness that turns a simple ear of corn into the star of the show.
Why This Dish is a Summer Favorite
There’s something special about eating corn fresh from the cob during warm weather, especially when it’s roasted to perfection and smothered in cheese. Cheesy corn side dishes have become a staple at backyard BBQs, picnics, and casual get-togethers—and for good reason.
For one, it’s versatile. You can make it spicy, herby, or even toss in an international twist with flavors like chipotle or garlic-parmesan. Plus, it’s super easy to scale up for larger crowds. With minimal prep and baking time, it’s a no-fuss dish that brings big flavor without the stress.
So whether you’re a corn-on-the-cob purist or a culinary adventurer, this recipe offers something everyone can enjoy. Up next, we’ll talk about how to pick the perfect corn to set your dish up for cheesy success.
Selecting the Perfect Corn
Fresh vs. Frozen: Making the Right Choice
When it comes to making Cheesy Baked Corn on the Cob, the base ingredient—corn—matters a lot. While frozen or canned corn might be handy, nothing beats the flavor of fresh ears straight from the market or farm stand. Fresh corn offers natural sweetness, juicy texture, and that iconic snap when you bite in.
However, if it’s off-season or fresh corn isn’t available, don’t worry! Frozen corn cobs can still work as a solid backup. Just make sure to thaw them properly and pat them dry before seasoning. This way, you avoid soggy results and ensure your cheese melts just right.
Tips for Choosing the Best Corn at the Market
When picking fresh corn, look for bright green husks that are tightly wrapped around the cob. The silk should be golden and slightly sticky, not dry or black. And here’s a tip: give the cob a gentle squeeze. It should feel firm and plump—no soft or flat spots.
Moreover, check the kernels by peeling back a bit of the husk. They should be tightly packed, shiny, and free of dents. Avoid any ears with missing rows or shriveled grains. Remember, great corn is the foundation of great flavor!
Therefore, if you start with high-quality, sweet corn, your cheesy corn side dish will naturally shine—even before the cheese hits the top.
Essential Ingredients for Maximum Flavor
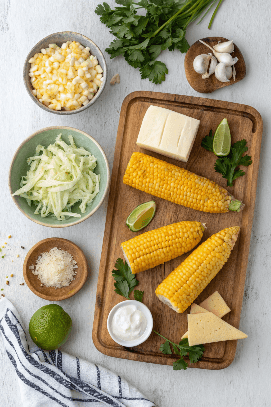
Cheese Varieties: From Cheddar to Cotija
The cheese is the heart of any Cheesy Baked Corn on the Cob. And thankfully, there’s more than one way to do it right. Sharp cheddar gives you that classic bite, while mozzarella melts beautifully for a gooey pull. Cotija or parmesan adds a salty punch and a slightly nutty edge—perfect if you’re looking for that Mexican street corn vibe.
Feel free to mix and match! For example, cheddar and mozzarella make a rich duo, offering both flavor and texture. Want something bold? Sprinkle in blue cheese crumbles. Looking for something smoky? Try smoked gouda or even pepper jack.
Additional Ingredients: Spices, Herbs, and More
To elevate your oven-roasted corn, you’ll want more than cheese. A bit of spice, a brush of garlic butter, and fresh herbs can make all the difference. For a smoky touch, try paprika or chipotle powder. Garlic powder or minced garlic adds savory depth. And don’t forget a pinch of salt and pepper—it ties everything together.
Moreover, a squeeze of lime just before serving adds a pop of acidity that cuts through the richness of the cheese. It’s a small touch, but it makes a huge impact!
Here’s a table of the must-have ingredients for your cheesy corn:
| Ingredient | Quantity |
|---|---|
| Fresh corn on the cob | 4 ears |
| Unsalted butter (melted) | 3 tablespoons |
| Garlic (minced) | 2 cloves |
| Paprika | 1 teaspoon |
| Salt | ½ teaspoon |
| Black pepper | ¼ teaspoon |
| Cheddar cheese (shredded) | 1 cup |
| Mozzarella cheese | 1 cup |
| Cotija cheese (optional) | ½ cup, crumbled |
| Chopped parsley or cilantro | 2 tablespoons |
| Lime wedges | For serving |
These ingredients will help you create that irresistible cheesy baked corn on the cob that’s crisp, creamy, and bursting with flavor.
Step-by-Step Cooking Instructions
Preparing the Corn: Cleaning and Prepping
Before diving into the cheesy goodness, start by prepping your corn. First, remove the husks and silks from each ear. Rinse them under cold water to eliminate any remaining silk strands. Then, pat them dry with a clean towel. This step ensures that the butter and seasonings adhere properly, enhancing the flavor of your Cheesy Baked Corn on the Cob.
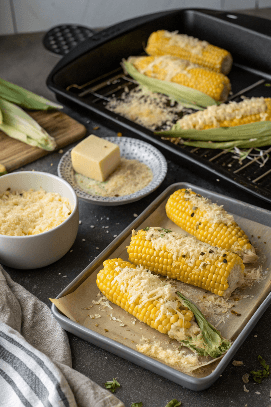
Baking Techniques: Oven Settings and Timing
Preheat your oven to 375°F (190°C). While the oven heats, place the cleaned corn cobs on a baking sheet lined with parchment paper or aluminum foil. Brush each ear generously with melted butter, ensuring all sides are coated. Sprinkle your chosen seasonings evenly over the corn.
Once seasoned, place the baking sheet in the preheated oven. Bake the corn for 25-30 minutes, turning them halfway through to ensure even cooking. The kernels should become tender and slightly golden, indicating they’re ready for the next step.
Achieving the Perfect Cheese Melt
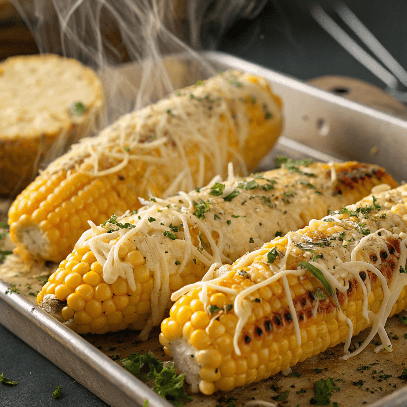
After the initial baking, it’s time to add the cheese. Remove the corn from the oven and sprinkle a generous amount of shredded cheese over each ear. Return the corn to the oven and bake for an additional 5-7 minutes, or until the cheese is melted and bubbly. For a golden-brown finish, broil the corn for 1-2 minutes, keeping a close eye to prevent burning.
Once done, remove the corn from the oven and let it cool slightly. Garnish with freshly chopped herbs, such as parsley or cilantro, and a squeeze of lime juice for an extra burst of flavor. Serve immediately and enjoy your delicious Cheesy Baked Corn on the Cob!
Flavor Variations to Try
Spicy Kick: Adding Jalapeños or Chili Powder
For those who enjoy a bit of heat, adding jalapeños or chili powder can elevate your Cheesy Baked Corn on the Cob. Finely chop fresh jalapeños and sprinkle them over the corn before adding the cheese. Alternatively, mix chili powder into the melted butter before brushing it onto the corn. This spicy twist pairs well with the sweetness of the corn and the richness of the cheese.
Herb-Infused: Incorporating Fresh Herbs
Incorporating fresh herbs can add a refreshing flavor to your corn. Mix chopped herbs like basil, thyme, or rosemary into the melted butter before applying it to the corn. These herbs infuse the corn with aromatic flavors that complement the cheesy topping. Additionally, sprinkling fresh herbs over the finished dish adds a pop of color and freshness.
International Twists: Korean and Mexican Influences
Exploring international flavors can bring new life to your Cheesy Baked Corn on the Cob. For a Korean-inspired version, brush the corn with a mixture of gochujang (Korean chili paste), soy sauce, and sesame oil before baking. Top with shredded mozzarella and a sprinkle of sesame seeds.
For a Mexican twist, consider making Elote-style corn. After baking, slather the corn with a mixture of mayonnaise, lime juice, and chili powder. Sprinkle crumbled Cotija cheese and chopped cilantro on top. This variation offers a tangy, spicy, and savory flavor profile that’s sure to impress.
Serving Suggestions and Pairings
Ideal Main Courses to Accompany the Dish
Cheesy Baked Corn on the Cob isn’t just a standout side—it’s also a brilliant match for many main dishes. For instance, pair it with grilled steaks, roasted chicken, or smoky BBQ ribs for a hearty summer meal. The rich, melty cheese and seasoned corn balance the bold flavors of grilled meats perfectly.
Moreover, this side dish works beautifully with vegetarian mains like black bean burgers or grilled portobello mushrooms. Because the corn delivers both creaminess and crunch, it adds variety and satisfaction to meat-free plates.
Want to keep it light? Serve the corn alongside a fresh garden salad or a zesty quinoa bowl. These combos help cut through the richness while keeping your meal balanced and wholesome.
Presentation Tips for Impressing Guests
Let’s be honest—presentation makes all the difference, especially when you want to impress. Therefore, consider serving Cheesy Baked Corn on the Cob on a rustic wooden board, garnished with extra herbs and lime wedges for a pop of color and freshness.
To keep things mess-free, slide corn holders or skewers into each cob. Not only are they practical, but they also add a fun, festive touch. For a more upscale look, sprinkle on a dash of smoked paprika and drizzle a bit of garlic aioli or herbed butter on top.
And don’t forget—warm plates keep the cheese gooey longer, so serve straight from the oven when possible!
Common Mistakes and How to Avoid Them
Overcooking the Corn
One of the biggest mistakes with Cheesy Baked Corn on the Cob is overcooking it. When corn is baked too long, the kernels become tough and chewy instead of sweet and juicy. To avoid this, keep a close eye on your oven timer and rotate the corn halfway through for even cooking.
Moreover, consider pre-steaming the corn for a few minutes before baking if your ears are particularly thick or older. This helps them cook through without drying out in the oven.
Using the Wrong Cheese Type
Another common misstep? Choosing cheese that doesn’t melt well. Hard cheeses like parmesan can burn quickly or stay clumpy instead of creating that desired ooey-gooey layer. Instead, opt for cheeses that melt smoothly, such as cheddar, mozzarella, or Monterey Jack.
That said, you can still sprinkle harder cheeses on top as a finishing touch after baking. Just don’t rely on them as your main melty layer. And always shred your own cheese when possible—pre-shredded varieties often contain anti-caking agents that prevent proper melting.
Lastly, don’t skip seasoning. A little salt, garlic, or paprika goes a long way in boosting the flavor of your dish!
FAQs
Can I Use Canned Corn Instead of Fresh?
Technically, yes—but it’s not ideal. Cheesy Baked Corn on the Cob shines best when made with whole, fresh corn cobs. Canned corn kernels lack the texture and natural sweetness of fresh corn, and they won’t bake or hold cheese the same way. However, in a pinch, you can use canned corn to create a deconstructed version. Simply mix the drained kernels with butter, spices, and cheese, then bake in a dish until bubbly. It’s still tasty—just not the same experience.
How Do I Store Leftovers?
If you’ve got leftover Cheesy Baked Corn on the Cob (lucky you!), let it cool completely before storing. Wrap each cob tightly in foil or place them in an airtight container. Then refrigerate for up to 3 days. When you’re ready to eat, reheat in the oven at 350°F for 10–12 minutes. This keeps the cheese melty and the corn moist. Avoid microwaving if you can, as it often makes the corn rubbery.
Moreover, if you want to repurpose leftovers, slice the kernels off and toss them into salads, rice bowls, or quesadillas. It’s a great way to minimize waste while enjoying a fresh twist.
Is This Dish Suitable for Grilling Instead of Baking?
Absolutely! Grilling brings out an extra smoky flavor that works wonders for this dish. Just prep the corn as usual—seasoned and buttered—then wrap in foil and grill over medium heat for 15–20 minutes, turning occasionally. Once done, unwrap and top with cheese while still hot. You can even place it briefly back on the grill to melt the cheese.
So, while oven-roasted corn gives you convenience, grilling offers that charred edge many people love. Either way, Cheesy Baked Corn on the Cob remains a showstopper on any table.
for more easy recipes chek our categorys globalyrecipe.us


