
Who doesn’t love a good old-fashioned apple pie recipe? It’s the kind of dessert that brings everyone to the table, filling the air with sweet, spiced aromas and wrapping you in the warmth of nostalgia. But this isn’t just any pie—we’re diving deep into everything you need to know to bake the perfect homemade apple pie. From crust to filling, storage to variations, this guide covers it all. Whether you’re baking for a fall gathering or just want to cozy up on a chilly evening, you’re in the right place.
In this article, we’ll explore the history behind apple pie, how to choose the best apples, create a flaky crust, and whip up a filling so good it could stand on its own. Moreover, we’ll talk about fun variations, handy storage tips, and answer all your burning questions. Buckle up—this pie journey is going to be as rich as the dessert itself!
The Rich History of Apple Pie
Origins and Evolution of Apple Pie
Ah, apple pie—as American as…well, you know. But would you believe it didn’t actually originate in the United States? That’s right. The apple pie recipe traces its roots back to 14th-century England, where early versions were more savory than sweet, and apples were often baked with figs, raisins, or even meat. Wild, right?
By the time the recipe made its way across the Atlantic, American settlers had already embraced apples as a staple. Orchards flourished, and pie became a go-to way to use up fruit before it spoiled. The sweet version we know today didn’t take off until sugar became more affordable—and boy, are we glad it did!
Apple Pie’s Cultural Significance in America
Fast-forward to modern times, and apple pie has become a symbol of home, tradition, and patriotism. During WWII, American soldiers famously said they were fighting for “mom and apple pie,” solidifying its spot in our national identity.
However, it’s more than just a symbol—apple pie is comfort in a crust. It’s what you bring to potlucks, bake for the holidays, or serve on a quiet Sunday afternoon. In a world that changes fast, that golden crust and spiced apple filling offer a slice of something wonderfully familiar.
So while it may not have been born here, it sure found its heart in America. And that heart? It beats strongest in kitchens just like yours.
Selecting the Perfect Apples for Your Pie
Best Apple Varieties for Baking
When it comes to the apple pie recipe, not just any apple will do. You need apples that hold their shape and bring the right balance of sweet and tart. Some apples turn mushy when baked—delicious for sauce, but not for pie.
Here are the top choices for baking:
| Apple Variety | Flavor Profile | Texture |
|---|---|---|
| Granny Smith | Tart and crisp | Firm, holds shape |
| Honeycrisp | Sweet with a tang | Juicy, keeps texture |
| Braeburn | Balanced, slightly spicy | Firm and juicy |
| Jonagold | Sweet-tart blend | Soft but stable |
| Fuji | Very sweet | Crisp, keeps shape |
However, the real secret? Mixing varieties. For example, pairing tart Granny Smiths with sweet Honeycrisp creates a more complex, layered flavor. Moreover, it helps balance the sugar and spices later on.
Balancing Sweetness and Tartness
A well-balanced apple pie recipe should never be one-note. By combining apples with different flavor notes, you’ll hit that perfect middle ground. For instance, tart apples wake up your taste buds, while sweeter ones mellow everything out.
Therefore, always taste your apples before baking. Some seasons yield sweeter crops than others. Adjust your sugar accordingly, and you’ll never bite into an overly sweet or dull pie again.
Crafting the Ideal Pie Crust
Ingredients for a Flaky Crust
Ah, the crust—the buttery, golden hug around your filling. A perfect crust is flaky, not soggy; tender, yet strong enough to hold its juicy contents. And guess what? It’s not as tricky as it seems.
Here’s what you’ll need:
| Ingredient | Quantity |
|---|---|
| All-purpose flour | 2 ½ cups (300g) |
| Unsalted butter | 1 cup (226g), cold and cubed |
| Salt | 1 tsp |
| Granulated sugar | 1 tbsp (optional) |
| Ice water | 6–8 tbsp |
Step-by-Step Guide to Making Pie Dough
First things first—cold ingredients are key. Cold butter = flaky layers. Using a pastry cutter (or even your fingers), blend the butter into the flour until the mix looks like coarse crumbs. However, don’t overwork it—you want some butter bits to stay visible.
Next, slowly add ice water, one tablespoon at a time, just until the dough starts to come together. It should hold when pinched but not feel wet. Divide it in two, flatten into discs, wrap in plastic, and chill for at least an hour. This step helps relax the gluten and firms up the fat, making your crust easier to roll and bake.
Moreover, resting your dough ensures fewer cracks and shrinkage in the oven. Once chilled, roll it out on a floured surface, about ⅛ inch thick, and gently fit it into your pie dish.
Voilà! You’re now crust-confident. This base will elevate your apple pie recipe from good to unforgettable.
Preparing the Apple Filling
Essential Ingredients for the Filling
Crafting a delectable apple filling is crucial for a standout apple pie recipe. Here’s what you’ll need:
| Ingredient | Quantity |
|---|---|
| Mixed baking apples | 8 cups, peeled and sliced |
| Granulated sugar | ¾ cup |
| Brown sugar | ¼ cup |
| Lemon juice | 2 tablespoons |
| Ground cinnamon | 1 tablespoon |
| Ground nutmeg | ¼ teaspoon |
| Ground cardamom (optional) | ¼ teaspoon |
| Cornstarch or tapioca starch | 3 tablespoons |
| Unsalted butter | 2 tablespoons, diced |
Techniques for Pre-Cooking Apples
To achieve a filling that’s neither too runny nor overly firm, consider pre-cooking your apples:
- Combine Ingredients: In a large bowl, toss the sliced apples with lemon juice, sugars, spices, and starch. Let this mixture sit for about 30 minutes. This maceration process draws out excess moisture.
- Cook the Mixture: Transfer the apple mixture to a saucepan over medium heat. Cook for 10 minutes, stirring occasionally, until the apples begin to soften and the juices thicken slightly.
- Cool Before Using: Allow the filling to cool to room temperature before assembling your pie. This step prevents the crust from becoming soggy.
Assembling and Baking the Pie
Layering the Filling and Crust
Now that your crust and filling are ready, it’s time to assemble:
- Prepare the Bottom Crust: Roll out one disc of chilled dough to fit your pie dish. Gently place it into the dish, ensuring it covers the bottom and sides evenly.
- Add the Filling: Spoon the cooled apple filling into the crust, spreading it evenly.
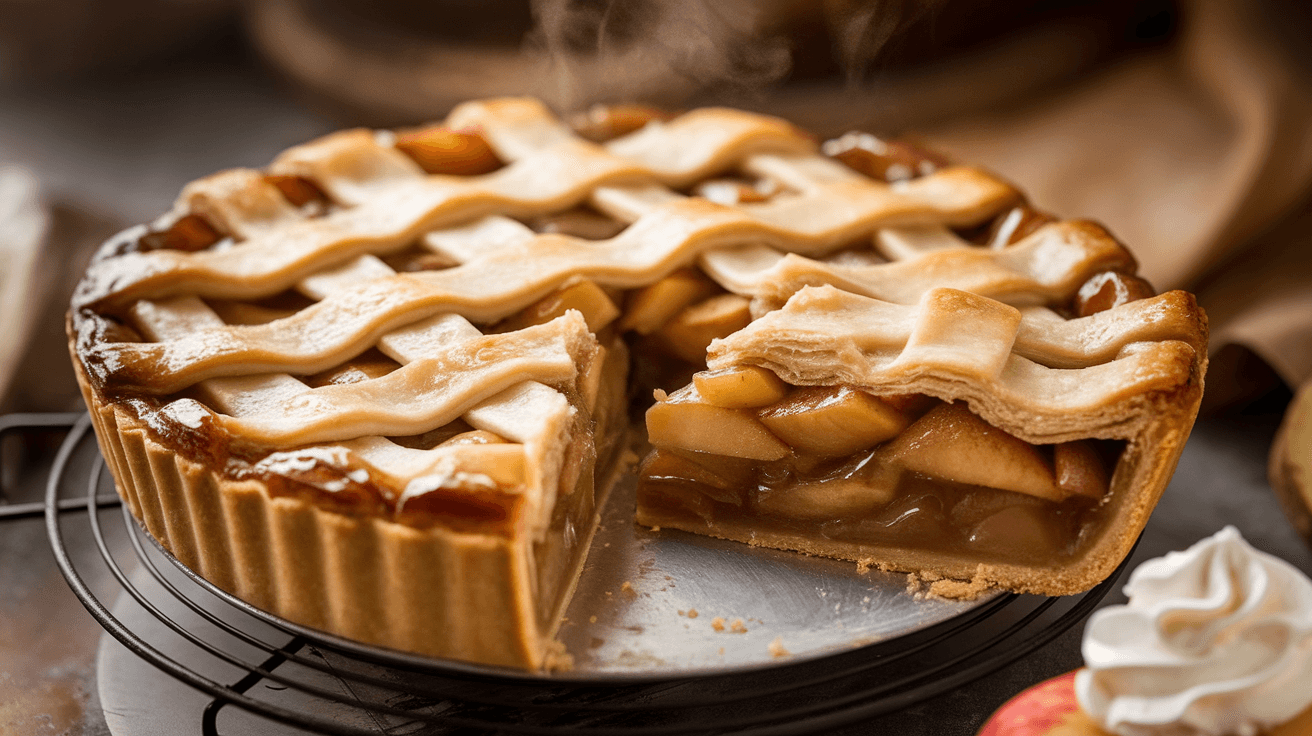
- Top Crust Options: Roll out the second dough disc and place it over the filling. You can opt for a full cover or create a lattice pattern for a classic look.
- Seal and Vent: Trim any excess dough and crimp the edges to seal. If using a full top crust, cut a few slits to allow steam to escape.
- Apply Egg Wash: Brush the top crust with a beaten egg mixed with a tablespoon of water. This gives the pie a golden, glossy finish.
Baking Tips for a Golden-Brown Finish
Proper baking ensures a flaky crust and bubbling filling:
- Preheat Oven: Set your oven to 425°F (220°C).
- Initial Bake: Place the pie on the middle rack and bake for 20 minutes. This high heat helps set the crust.
- Reduce Temperature: Lower the oven temperature to 375°F (190°C) and continue baking for 35-40 minutes. The filling should be bubbly, and the crust golden brown.
- Cool Before Serving: Allow the pie to cool for at least 2 hours. This helps the filling set, making slicing easier.
Serving Suggestions and Pairings
Classic Accompaniments: Ice Cream and Cheese
Now that your pie is baked and the aroma has filled the kitchen, let’s talk about the best ways to serve it. A warm slice of apple pie recipe perfection begs for something cool and creamy on the side. The classic choice? Vanilla ice cream. Its sweetness and smooth texture contrast beautifully with the spiced apples and flaky crust.
However, for a traditional twist, try a slice of sharp cheddar cheese on top. Yes, cheese! Especially in parts of the Midwest and Northeast, this combo is beloved. The salty bite of cheddar balances the pie’s sweetness, making every bite sing.
Modern Twists and Presentation Ideas
If you’re in the mood to dress things up, drizzle your pie with salted caramel sauce or a light dusting of powdered sugar. Moreover, serving it in individual ramekins or mason jars can be a fun, Instagram-worthy twist.
Pair it with a hot cup of spiced cider or mulled wine to elevate your dessert into a full-on cozy experience. No matter how you serve it, this apple pie recipe is sure to warm hearts—and bellies!
Storing and Reheating Leftovers
Proper Storage Methods
Let’s say you managed not to eat the whole thing in one sitting—what now? Fortunately, storing your pie is easy. If you’re saving leftovers for tomorrow, just cover the pie loosely with foil or plastic wrap and leave it at room temperature for up to 2 days.
However, for longer storage, refrigerate it. Wrapped well, your pie will stay fresh in the fridge for up to 5 days. Want to go the extra mile? Freeze individual slices wrapped tightly in plastic wrap and aluminum foil. They’ll keep for up to 3 months.
Reheating Tips to Maintain Freshness
When it’s time to reheat, skip the microwave if possible. While it’s quick, it can leave your crust soggy. Instead, preheat your oven to 350°F (175°C), place your slice on a baking sheet, and warm it for about 10–15 minutes.
This keeps the crust crispy and the filling gooey. And yes, it tastes just as amazing—if not better—than the first time.
So don’t let your apple pie recipe go to waste. With the right care, those last slices can be just as delightful as the first.
Frequently Asked Questions
How to Prevent a Soggy Bottom Crust?
Nobody wants a soggy pie bottom. Luckily, avoiding it is easier than you think. First, pre-bake (or “blind bake”) your bottom crust for about 10 minutes before adding the filling. This helps create a barrier. Also, using a metal or glass pie dish allows better heat distribution.
Moreover, avoid overfilling with juice. As mentioned earlier in this apple pie recipe, pre-cooking your apple filling can help reduce excess moisture. Lastly, a sprinkle of breadcrumbs or crushed cookies on the crust before filling can absorb extra liquid.
Can I Freeze Apple Pie?
Absolutely! You can freeze a fully baked pie or an unbaked, assembled one. To freeze a baked pie, let it cool completely, then wrap it tightly in plastic wrap and foil. It’ll stay good for up to 3 months.
If freezing before baking, wrap it the same way. When ready to bake, no need to thaw—just place it in the oven and bake a little longer than usual.
What’s the Best Way to Reheat Apple Pie?
While the microwave works in a pinch, the oven is your best bet. Reheat slices at 350°F (175°C) for 10–15 minutes. For whole pies, bake at the same temperature for about 25 minutes, loosely covered with foil to prevent over-browning.
Exploring Variations of Apple Pie
Dutch Apple Pie with Streusel Topping
If you’re in the mood for a twist on the classic apple pie recipe, try the Dutch version. Instead of a top crust, it’s topped with a sweet, buttery crumb topping. It’s crunchier, sweeter, and pairs wonderfully with tart apples.
To make the streusel, mix:
- ½ cup brown sugar
- ½ cup flour
- ½ teaspoon cinnamon
- ¼ cup butter (cold and cubed)
Blend until crumbly and sprinkle generously over your pie before baking.
Gluten-Free and Vegan Alternatives
No need to miss out if you’re gluten-free or vegan. For a gluten-free crust, substitute all-purpose flour with a 1:1 gluten-free blend. Also, add a touch of xanthan gum for structure.
To make it vegan, swap butter with coconut oil or plant-based margarine, and use non-dairy milk for brushing the crust. The result? Still flaky and flavorful.
Incorporating Unique Ingredients like Miso or Ricotta
Feeling adventurous? Add a tablespoon of white miso paste to the apple filling. It brings a deep, umami-rich flavor that enhances the sweetness of the apples.
Or, for a creamy surprise, mix a dollop of ricotta cheese into the filling or serve it on the side. It adds richness and balances the pie’s spice.
for more recipes stay in globalyrecipes.us